Monday, October 22, 2007

Real-Time Data Acquisition -BI@2004s


RDA - real-time data acquisition


Using new functionality of Real-time Data Acquisition (RDA) with the NetWeaver (BI) 2004s system we can now load transactional data into SAP BI system every single minute. If your business is demanding real-time data in SAP BI, you should start exploring RDA.


The source system for RDA could be SAP System or it could be any non-SAP system. SAP is providing most of the Standard DataSources as real-time enabled.


The other alternative for RDA is Web Services, even though Web Services are referred for non-SAP systems, but for testing purpose here I am implementing Web Service (RFC) in SAP source system.


Below are the steps to load real time data from SAP source system to SAP BI system using Web Services @RDA concept.


  1. Create Web Services DataSource in BI system. When you will activate Web Service DataSource it will create Web Service/RFC FM automatically for you. (/BIC/CQFI_GL_00001000)


  2. Create transformation on Data Target (DSO) while taking Web Service DataSource as source of transformation.


  3. Create DTP on Data Target by selecting DTP type as ‘DTP for Real-Time Dara Acquisition’


  4. Create InfoPackage. (When you create InfoPackage for Web Services DataSource it will automatically enable Real-Time field for you, but if when you create it for SAP Source System DataSource you have to enable Real-Time field while creating InfoPackage, if your DataSource supports RDA)


  5. In the processing tab of InfoPackage we enter the maximum time (Threshold value) for each request to open. Once that limit is cross RDA creates new request. The data is updated into data target ASAP it comes from Source System (~ 1 min), even though request will be open to take new record.


6. Click on Assign window(schedule tab) to go to RDA Monitor. (You can also go to RDA Monitor using TCode RSRDA)


7. Assign a new Daemon for DataSource from Unassigned node. (Required to start the Daemon)


8. Assign the DTP to newly created Daemon.


9. Call RFC from the Source System, which got created when we created DataSource. Check Appendix for creating test FM to call RFC from (ZTEST_BW) Source System.


10. Under RDA Monitor or PSA table now you can check 1 record under Open Request.


When you call RFC from Source System it will take ~ one minute to load it to PSA of DataSource. Once the record will come to PSA Table, RDA Daemon will create new open request for DTP, and update the data into Data Target at the same time.


11. Close the Request. You can manually close the request also, it will create new request for the same InfoPackage. It is required for performance reason even though it’s not a mandatory step.


12. Stop the Daemon Load. Even though the Daemon will run under sleep mode all the time, and once the request will come from source system it will start working automatically. In General practice we don’t need to close the Daemon, but if it is required by any chance you can.


13. AppendixCreate Test FM to call the RFC in BI system. (I am using RFC for testing purpose you can also use Web Service)Below is the FM that will get created automatically on BI side when we activate Web Services DataSource.


9. Start the Daemon.


10. Once you start the Daemon, you can check Open Request in PSA of DataSource or in RDA Monitor under InfoPackage also.


It takes Import parameter as a Table Type, which is linked to Line Type Structure.

Error DTP

While loading data records using DTP, error records get updated into Error Stack of DTP. Error Stack is physically a type of PSA table, we correct errors in Error Stack, and then we create Error DTP to load changed data from Error Stack to Data Target.
  1. correct error stack by edit it.
  2. Creating Error DTP from the update tab of standard DTP.
  3. a new DTP was created ,type is error DTP ,can navigate from standard DTP or from AWB tree.
  4. Schedule the Error DTP from Execute tab.
  5. after erro DTP run successfully the standard DTP also have a green status

about DTP

  • default It is recommended to configure the DTP with upload mode “Delta”. The deletion of the PSA data is necessary before each data load, if a “Full” DTP is used. A Full DTP extracts all Requests from the PSA regardless if the data has been already loaded or not. This means the Delta upload via a DTP from the DataSource (PSA) in the InfoCube is necessary, even if the data is loaded via a Full upload from the Source to the DataSource (PSA) by using an InfoPackage. ( which means load from PSA via DTP will load all data from PSA no matter the data were loaded before or not,so eother PSA should delted after load ,or DTP use delta even laod form Data source to PSA use delta already)
  • Only get Delta Once:
  • Get Data by Request: get the oldest request
  • Get runtime information of a Data Transfer Process (DTP) in a Transformation : I will give detail in another blog .
  • Debug a Data Transfer Process (DTP) Request:The debugging expert mode can be started from the execute tab of the DTP. The “Expert Mode” flag appears when the Processing Mode “Serially in the Dialog Process (for Debugging)” is selected.
    Choose “Simulate” to start the Debugger in expert mode.The debugging for loaded data can be executed from the DTP Monitor directly.
    Choose “Debugging”.

Minimize the Reporting Downtime during the initial data load

Detailed steps per scenario:
Common steps executed in SAP ERP system and BI to initialize the delta handling1. Stop booking in SAP ERP2. Fill Setup tables in SAP ERP e.g. for logistic (DataSource: 2LIS_03_BF)3. Init delta InfoPackage with or w/o data transfer, dependent on the scenarioScenario A: Init delta InfoPackage with data transferScenario B and C: Init delta InfoPackage w/o data transfer4. Start booking in SAP ERP5. Schedule delta Load data with normal process chain (including Delta InfoPackage and delta DTP)
(A) Get the historical data out of the source system directly into the InfoProviderA1. Stop Delta Process Chain (5)A2. Load data with full InfoPackage and SelectionsA3. Delta DTP to propagate the data into the InfoProviderA4. Start Delta Process Chain (5)
(B) Get the historical data out of the source system into the PSA first and not directly into the InfoProvider B1. Stop Delta Process Chain (5)B2. Load data with full InfoPackage and Selections into the PSA (store the selection criterias)B3. Init DTP w/o data transferB4. Schedule Delta Process Chain (5)
(C) Load the historical data from the PSA into the InfoProvider C1. Stop Delta Process Chain (5)C2. Load a Full DTP with same selection criteria in B2 from the PSA into the InfoCubeC3. Start Delta Process Chain (5)

How to improve FI_GL_4 data extract


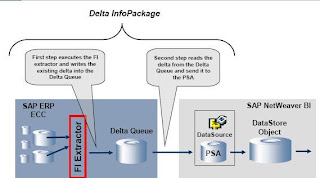
When a Delta InfoPackage for the DataSource 0FI_GL_4 is executed in SAP NetWeaver
BI (BI), the extraction process in the ECC source system mainly consists of two activities:
- First the FI extractor calls a FI specific function module which reads the new and
changed FI documents since the last delta request from the application tables
and writes them into the Delta Queue.
- Secondly, the Service API reads the delta from the Delta Queue and sends the FI
documents to BI.


The time consuming step is the first part. This step might take a long time to collect all
the delta information, if the FI application tables in the ECC system contain many entries
or when parallel running processes insert changed FI documents frequently.

A solution might be to execute the Delta InfoPackage to BI more frequently to process
smaller sets of delta records. However, this might not be feasible for several reasons:
First, it is not recommended to load data with a high frequency using the normal
extraction process into BI. Second, the new Real-Time Data Acquisition (RDA)
functionality delivered with SAP NetWeaver 7.0 can only be used within the new
Dataflow. This would make a complete migration of the Dataflow necessary. Third, as of
now the DataSource 0FI_GL_4 is not officially released for RDA.
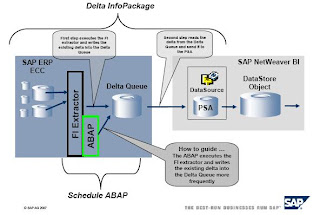
To be able to process the time consuming first step without executing the delta
InfoPackage the ABAP report attached to this document will execute the first step of the
extraction process encapsulated. The ABAP report reads all the new and changed
documents from the FI tables and writes them into the BI delta queue. This report can be
scheduled to run frequently, e.g. every 30 minutes.
The Delta InfoPackage can be scheduled independently of this report. Most of the delta
information will be read from the delta queue then. This will greatly reduce the number of
records the time consuming step (First part of the extraction) has to process from the FI
application as shown in the picture below.


The Step By Step Solution
4.1 Implementation Details
To achieve an encapsulated first part of the original process, the attached ABAP report is
creating a faked delta initialization for the logical system 'DUMMY_BW'. (This system can
be named anything as long as it does not exist.) This will create two delta queues for the
0FI_GL_4 extractor in the SAP ERP ECC system: One for the ‘DUMMY_BW’ and the
other for the 'real' BI system.
The second part of the report is executing a delta request for the ‘DUMMY_BW’ logical
system. This request will read any new or changed records since the previous delta
request and writes them into the delta queues of all connected BI systems.
The reason for the logical BI system ‘DUMMY_BW’ is that the function module used in
the report writes the data into the Delta Queue and marks the delta as already sent to
the ‘DUMMY_BW’ BI system.
This is the reason why the data in the delta queue of the ‘DUMMY_BW’ system is not
needed for further processing. The data gets deleted in the last part of the report.
The different delta levels for different BI systems are handled by the delta queue and are
independent from the logical system.
Thus, the delta is available in the queue of the 'real' BI system, ready to be sent during
the next Delta InfoPackage execution.
This methodology can be applied to any BI extractors that use the delta queue
functionality.
As this report is using standard functionality of the Plug-In component, the handling of
data request for BI has not changed. If the second part fails, it can be repeated. The
creation & deletion of delta-initializations is unchanged also.
The ABAP and the normal FI extractor activity reads delta sequential. The data is sent
to BI parallel.
If the report is scheduled to be executed every 30 minutes, it might happen that it
coincides with the BI Delta InfoPackage execution. In that case some records will be
written to the delta queues twice from both processes.
This is not an issue, as further processing in the BI system using a DataStore Object with
delta handling capabilities will automatically filter out the duplicated records during the
data activation. Therefore the parallel execution of this encapsulated report with the BI
delta InfoPackage does not cause any data inconsistencies in BI. (Please refer also to
SAP Note 844222.)
- 5 -
4.2 Step by Step Guide
1. Create a new Logical System using
the transaction BD54.
This Logical System name is used in
the report as a constant:
c_dlogsys TYPE logsys VALUE 'DUMMY_BW'
In this example, the name of the
Logical System is ‘DUMMY_BW’.
The constant in the report needs to
be changed accordingly to the
defined Logical System name in this
Step.
2. Implement an executable ABAP
report
YBW_FI_GL_4_DELTA_COLLECT
in transaction SE38.
The code for this ABAP report can
be found it the appendix.
- 6 -
3. Maintain the selection texts of the
report.
In the ABAP editor
In the menu, choose Goto 􀃆 Text
Elements 􀃆 Selection Texts
4. Maintain the text symbols of the
report.
In the ABAP editor
In the menu, choose Goto 􀃆 Text
Elements 􀃆 Text Symbols
- 7 -
5. Create a variant for the report. The
"Target BW System" has to be an
existing BI system for which a delta
initialization exists.
In transaction SE38, click Variants
6. Schedule the report via transaction
SM36 to be executed every 30
minutes, using the variant created in
step 5.
Code

*&---------------------------------------------------------------------*
*& Report YBW_FI_GL_4_DELTA_COLLECT
*&
*&---------------------------------------------------------------------*
*&
*& This report collects new and changed documents for the 0FI_GL_4 from
*& the FI application tables and writes them to the delta queues of all
*& connected BW system.
*&
*& The BW extractor itself therefore needs only to process a small
*& amount of records from the application tables to the delta queue,
*& before the content of the delta queue is sent to the BW system.
*&
*&---------------------------------------------------------------------*
REPORT ybw_fi_gl_4_delta_collect.
TYPE-POOLS: sbiw.
* Constants
* The 'DUMMY_BW' constant is the same as defined in Step 1 of the How to guide
CONSTANTS: c_dlogsys TYPE logsys VALUE 'DUMMY_BW',
c_oltpsource TYPE roosourcer VALUE '0FI_GL_4'.
* Filed symbols
FIELD-SYMBOLS: TYPE roosprmsc,
TYPE roosprmsf.
* Variables
DATA: l_slogsys TYPE logsys,
l_tfstruc TYPE rotfstruc,
l_lines_read TYPE sy-tabix,
l_subrc TYPE sy-subrc,
l_s_rsbasidoc TYPE rsbasidoc,
l_s_roosgen TYPE roosgen,
l_s_parameters TYPE roidocprms,
l_t_fields TYPE TABLE OF rsfieldsel,
l_t_roosprmsc TYPE TABLE OF roosprmsc,
l_t_roosprmsf TYPE TABLE OF roosprmsf.
* Selection parameters
SELECTION-SCREEN: BEGIN OF BLOCK b1 WITH FRAME TITLE text-001.
SELECTION-SCREEN SKIP 1.
PARAMETER prlogsys LIKE tbdls-logsys OBLIGATORY.
SELECTION-SCREEN: END OF BLOCK b1.
AT SELECTION-SCREEN.
* Check logical system
SELECT COUNT * FROM tbdls BYPASSING BUFFER
WHERE logsys = prlogsys.
IF sy-subrc <> 0.
MESSAGE e454(b1) WITH prlogsys.
* The logical system & has not yet been defined
ENDIF.
START-OF-SELECTION.
* Check if logical system for dummy BW is defined (Transaction BD54)
SELECT COUNT * FROM tbdls BYPASSING BUFFER
WHERE logsys = c_dlogsys.
IF sy-subrc <> 0.
MESSAGE e454(b1) WITH c_dlogsys.
* The logical system & has not yet been defined
ENDIF.
* Get own logical system
CALL FUNCTION 'RSAN_LOGSYS_DETERMINE'
EXPORTING
i_client = sy-mandt
IMPORTING
e_logsys = l_slogsys.
* Check if transfer rules exist for this extractor in BW
SELECT SINGLE * FROM roosgen INTO l_s_roosgen
WHERE oltpsource = c_oltpsource
AND rlogsys = prlogsys
AND slogsys = l_slogsys.
IF sy-subrc <> 0.
MESSAGE e025(rj) WITH prlogsys.
* No transfer rules for target system &
ENDIF.
* Copy record for dummy BW system
l_s_roosgen-rlogsys = c_dlogsys.
MODIFY roosgen FROM l_s_roosgen.
IF sy-subrc <> 0.
MESSAGE e053(rj) WITH text-002.
* Update of table ROOSGEN failed
ENDIF.
* Assignment of source system to BW system
SELECT SINGLE * FROM rsbasidoc INTO l_s_rsbasidoc
WHERE slogsys = l_slogsys
AND rlogsys = prlogsys.
IF sy-subrc <> 0 OR
( l_s_rsbasidoc-objstat = sbiw_c_objstat-inactive ).
MESSAGE e053(rj) WITH text-003.
* Remote destination not valid
ENDIF.
* Copy record for dummy BW system
l_s_rsbasidoc-rlogsys = c_dlogsys.
MODIFY rsbasidoc FROM l_s_rsbasidoc.
IF sy-subrc <> 0.
MESSAGE e053(rj) WITH text-004.
* Update of table RSBASIDOC failed
ENDIF.
* Delta initializations
SELECT * FROM roosprmsc INTO TABLE l_t_roosprmsc
WHERE oltpsource = c_oltpsource
AND rlogsys = prlogsys
AND slogsys = l_slogsys.
IF sy-subrc <> 0.
MESSAGE e020(rsqu).
* Some of the initialization requirements have not been completed
ENDIF.
LOOP AT l_t_roosprmsc ASSIGNING .
IF -initstate = ' '.
MESSAGE e020(rsqu).
* Some of the initialization requirements have not been completed
ENDIF.
-rlogsys = c_dlogsys.
-gottid = ''.
-gotvers = '0'.
-gettid = ''.
-getvers = '0'.
ENDLOOP.
* Delete old records for dummy BW system
DELETE FROM roosprmsc
WHERE oltpsource = c_oltpsource
AND rlogsys = c_dlogsys
AND slogsys = l_slogsys.
* Copy records for dummy BW system
MODIFY roosprmsc FROM TABLE l_t_roosprmsc.
IF sy-subrc <> 0.
MESSAGE e053(rj) WITH text-005.
* Update of table ROOSPRMSC failed
ENDIF.
* Filter values for delta initializations
SELECT * FROM roosprmsf INTO TABLE l_t_roosprmsf
WHERE oltpsource = c_oltpsource
AND rlogsys = prlogsys
AND slogsys = l_slogsys.
IF sy-subrc <> 0.
MESSAGE e020(rsqu).
* Some of the initialization requirements have not been completed
ENDIF.
LOOP AT l_t_roosprmsf ASSIGNING .
-rlogsys = c_dlogsys.
ENDLOOP.
* Delete old records for dummy BW system
DELETE FROM roosprmsf
WHERE oltpsource = c_oltpsource
AND rlogsys = c_dlogsys
AND slogsys = l_slogsys.
* Copy records for dummy BW system
MODIFY roosprmsf FROM TABLE l_t_roosprmsf.
IF sy-subrc <> 0.
MESSAGE e053(rj) WITH text-006.
* Update of table ROOSPRMSF failed
ENDIF.
*************************************
* COMMIT WORK for changed meta data *
*************************************
COMMIT WORK.
* Delete RFC queue of dummy BW system
* (Just in case entries of other delta requests exist)
CALL FUNCTION 'RSC1_TRFC_QUEUE_DELETE_DATA'
EXPORTING
i_osource = c_oltpsource
i_rlogsys = c_dlogsys
i_all = 'X'
EXCEPTIONS
tid_not_executed = 1
invalid_parameter = 2
client_not_found = 3
error_reading_queue = 4
OTHERS = 5.
IF sy-subrc <> 0.
MESSAGE ID sy-msgid TYPE sy-msgty NUMBER sy-msgno
WITH sy-msgv1 sy-msgv2 sy-msgv3 sy-msgv4.
ENDIF.
*******************************************
* COMMIT WORK for deletion of delta queue *
*******************************************
COMMIT WORK.
* Get MAXLINES for data package
CALL FUNCTION 'RSAP_IDOC_DETERMINE_PARAMETERS'
EXPORTING
i_oltpsource = c_oltpsource
i_slogsys = l_slogsys
i_rlogsys = prlogsys
i_updmode = 'D '
IMPORTING
e_s_parameters = l_s_parameters
e_subrc = l_subrc.
.
IF l_subrc <> 0.
MESSAGE e053(rj) WITH text-007.
* Error in function module RSAP_IDOC_DETERMINE_PARAMETERS
ENDIF.
* Transfer structure depends on transfer method
CASE l_s_roosgen-tfmethode.
WHEN 'I'.
l_tfstruc = l_s_roosgen-tfstridoc.
WHEN 'T'.
l_tfstruc = l_s_roosgen-tfstruc.
ENDCASE.
* Determine transfer structure field list
PERFORM fill_field_list(saplrsap) TABLES l_t_fields
USING l_tfstruc.
* Start the delta extraction for the dummy BW system
CALL FUNCTION 'RSFH_GET_DATA_SIMPLE'
EXPORTING
i_requnr = 'DUMMY'
i_osource = c_oltpsource
i_showlist = ' '
i_maxsize = l_s_parameters-maxlines
i_maxfetch = '9999'
i_updmode = 'D '
i_rlogsys = c_dlogsys
i_read_only = ' '
IMPORTING
e_lines_read = l_lines_read
TABLES
i_t_field = l_t_fields
EXCEPTIONS
generation_error = 1
interface_table_error = 2
metadata_error = 3
error_passed_to_mess_handler = 4
no_authority = 5
OTHERS = 6.
IF sy-subrc <> 0.
MESSAGE ID sy-msgid TYPE sy-msgty NUMBER sy-msgno
WITH sy-msgv1 sy-msgv2 sy-msgv3 sy-msgv4.
ENDIF.
*********************************
* COMMIT WORK for delta request **********************************
COMMIT WORK.
* Delete RFC queue of dummy BW system
CALL FUNCTION 'RSC1_TRFC_QUEUE_DELETE_DATA'
EXPORTING
i_osource = c_oltpsource
i_rlogsys = c_dlogsys
i_all = 'X'
EXCEPTIONS
tid_not_executed = 1
invalid_parameter = 2
client_not_found = 3
error_reading_queue = 4
OTHERS = 5.
IF sy-subrc <> 0.
MESSAGE ID sy-msgid TYPE sy-msgty NUMBER sy-msgno
WITH sy-msgv1 sy-msgv2 sy-msgv3 sy-msgv4.
ENDIF.
* Data collection for 0FI_GL_4 delta queue successful
MESSAGE s053(rj) WITH text-008.
-->

Sunday, October 21, 2007

RZ20 Monitoring background jobs

CCMS

query designer: Temporal Joins for Hierarchies


The temporal join of time-dependent hierarchies allows you to view the leaves within a hierarchy under two (or more) nodes, depending on the validity period (attribute of the characteristic value).
To use this function you have to select the indicator for the "Use temporal hierarchy join" option. You make this setting in InfoObject maintenance on the "Hierarchy" tab page.
The following graphic provides an example of a temporal join for a hierarchy. The product "Monitor flat 17CN" is assigned to node "all monitors" until 02.2005. From 02.2005 the "Monitor flat 17CN" is assigned to "17" Monitors". Using the temporal joins for hierarchies function, you can display the same leaf under multiple nodes.

query design recommendations and performance issues

recommendations:
  1. free characteristics :There must be a meaningful number of characteristics here (maximum 8-10 characteristics) whose content is required for the data analysis. In addition, the free characteristics should be defined in the different queries that have the same InfoProvider in the most consistent way possible.
  2. Conditions: Conditions can require a lot of calculations (such as Top N or joining conditions). To improve query performance, one can precalculate the results set using the Reporting Agent in defined gaps and then transfer them to the query using a variable. See the section on Performance below. In NW04 you can use Information Broadcasting to
    precalculate Queries or Web Templates.
  3. Exception aggregation:
    In the query definition, the exception aggregation that was specified with the InfoObject
    maintenance can be overridden. This overriding leads to a worsening of performance
    however.
  4. General Points of the Design of Queries:
    For an InfoProvider, usually only very few, though more complex (around four) queries are delivered. Complex queries are not be used directly in a Web template as a data provider.They can be restricted using query views.
    Queries are only allowed for ODS to request individual records. This is because
    aggregation of the ODS records can lead to performance problems.
    We recommend to create Queries only based on Multi Provider (not on Info Cube or ODS
    level). If no existing Multi Provider is available, you should create a new Multi Provider.
    You can then split the Info Provider (e.g. by year) and use the Multi Provider as a virtual
    layer.
  5. Units
    Here you have the option using currency/unit 1CUDIm
    alongside the key figure structure to drilldown by different units and to build a total per unit.
  6. Decimal Places
    In the Query Designer, you can define the decimal places for each key figure. To do so,
    you need to open the dialog properties (right mouse click on the required key figure).
    Generally speaking, as many decimal places should be provided as required by the end
    user. However, the following usability guidelines should be taken into account when
    defining decimal places.
    • With percent values, a maximum of 2 decimal places should be used.
    • Key figures of data type integer are to be defined without decimal places.
    • Currency fields are to have a max. of 2 decimal places.
    • Key figures of data type DEC are to have a max. of 2 decimal places.
    • No decimal places are to be used with highly aggregated data (annual revenue).
  7. Don’ts in Query Design
    The multiplication of key figures leads to incorrect results in the total rows:
    Example: Revenue (price * amount) is to be displayed in the query:
    Price Quantity Revenue (price * amount)
    10 4 40
    5 6 30
    15 10 150
    Example: (a+b)/(c+d) instead of a/c + b/d
    Calculated key figures on totals are calculated by the OLAP processor analogous to
    the single records.
    These can lead to errors in the totals rows (revenue: 40 + 30 =
    150!!!!!! See red arrow).
    Instead of the average price, the amount and revenue should be saved in the
    InfoProvider.
    The average price (revenue/amount) can be generated in the query
    (see black arrow).
    • Hierarchy name cannot be delivered.
    • Partner Content Development: When saving Content objects, the associated
    package must be specified in the development system. Local objects have the
    package “$TMP” and are not transported. Query elements that are added
    subsequently are not allowed to be assigned to the package “$TMP” (also not for
    testing purposes), when the associated query was created on a correct development
    class.
    • Report-Report interface (Online Documentation): RRI settings must be collected
    individually. They will not be collected together with the corresponding Query.
  8. keep drill down as few as possible at the begining of the report.
  9. define calculated and restricted KF on Multiprovidor level.
  10. The expected result set of the query should be kept as small as possible (max. 1000
    lines).
  11. A Web application returns quicker query results than the BEx Analyzer. Also, the
    transfer time increases much quicker as the data set increases in the BEx Analyzer
    compared with the Web application.
  12. Using graphic elements (charts, buttons, frames..) significantly affects query runtime.
  13. InfoCubes and MultiProviders are optimized for aggregated requests. A user should
    only report in a very restricted way on ODS objects and InfoSets. In other words, only
    very specific records are to be read with little aggregation and navigation.
  14. All calculations that need to be made before aggregation (such as currency
    translation) should take place when loading data where possible (see note 189150).
  15. With selections it is better to include than exclude characteristic values.
  16. Do not use totals rows when they are not needed.
  17. The calculation of non-cumulative key figures takes a long time. In this case, the
    InfoCube must be compressed.
  18. Time characteristics should be restricted, ideally to the current characteristic value.

way to improve performance:

Precalculated Value Set

Aggregates

brief introduction of SAP EXIT

You can use
transaction SE16 to display all delivered SAP Exit variables in table RSZGLOBV with the
settings OBJVERS=D, IOBJNM = and VPROCTP =4
for a characteristic. SAP Exit variables are predominately used for the variable type
characteristic value variable (VARTYP =1). The ABAP coding belonging to a SAP Exit
variable can be found in the function module RSVAREXIT_
(se37). Nevertheless, the usual SAP Exit variables for time characteristics are filled using
the BW function module RREX_VARIABLE_EXIT.
With each new SAP Exit variable, a function module must be created with the name
RSVAREXIT_. A user can view/copy the interface in the existing module
RSVAREXIT_OP_FVAEX. The module is to be created in its own function group for the
application (such as BWCO for SAPExists in the Controlling area), so that any errors do
not influence other programs.
For the interface: I_VNAM contains the variable name (redundant as already in the name
of the module), I_VARTYP, I_IOBJNM and I_S_COB_PRO give information about the
variable and the corresponding InfoObject, I_S_RKB1D and I_S_RKB1F contain
information about the query (such as fiscal year variant in I_S_RKB1F-PERIV if not a
variable) and I_THX_VAR contains the already filled values of the variables. Here you can
find where appropriate values of a variable for 0FISCVARNT providing that I_S_RKB1FPERIV
is empty. In table E_T_RANGE, only fields SIGN, OPT, LOW and HIGH are
allowed to be filled. SIGN and OPT are also to be filled for parameter or interval variables
(with I and EQ or I and BT).
The variable processing type “Customer Exit” can be used in a similar way like the SAP
Exit variables delivered by the SAP Business Content.

Publish exceptions

1.create query with exceptions


2.use central alert framwork:


  • T-code ALRTCATDEF


  • create alert category


  • create containor element


  • create text for alert message


  • Then you can enter a text and a URL for a subsequent activity (optionally). E.g. you can add a link to a BI Query which should be checked by the recipient in order to react to the alert.


  • In the last step of the alert category configuration you have to assign the alert to the end users. You can enter fixed recipients or roles. If you enter a role, all users that are assigned to that role will get the alert. You can also enter roles, if you press the button "Subscription Authorization". In that case the assigned users will have the option to subscribe for the alert later.


  • In the next step you have to call the BEx Broadcaster and create an Information broadcasting setting based on the query, on which the exception has been defined on. As distribution type you have to choose "Distribute according to exceptions". In the details you can either choose the distribution type "Send Email" or "Create Alert", if you want to distribute the alert via the Universal Worklist. As selection criterion you can either choose to distribute all exceptions or you can choose a specific alert level. In our example we only want to distribute alerts, which have the level "Bad 3".


  • Then you have to assign the corresponding alert category you have created before to your Information broadcasting setting.


  • In the next step you have to do the mapping between the BI parameters of the Query and the alert container elements. These parameters will then be passed over to the alert.


  • In the last step you have to save the Information Broadcasting setting. You can execute the setting directly or you can schedule the execution e.g. periodically each week.


  • As a result you will see 2 new alerts in the Universal Worklist for all users which have been assigned to the alert corresponding alert category. You can access the Universal Worklist in the Enterprise Portal: Business Intelligence 􀃆Business Explorer 􀃆 Universal Worklist.